Quick wins for a faster PC:
Repair Windows errors before they cause bigger problemsFix Now →Scan for outdated or missing drivers - takes under a minuteDriver Scan →Clear out junk files and repair common Windows errorsFree Scan →To use the Casio Pro Trek PRG-270-1’s sensors, press A for altitude, B for barometer and temperature, or C for the compass. First check that your watch shows module number 3414; the button instructions below apply to that module, and other PRG-270 variants may differ. The PRG-270-1 has an altimeter, barometer/thermometer, and digital compass, but its readings are reference information—not professional-grade measurements or a substitute for safe navigation.
Casio lists the model’s altitude display range as −700 to 10,000 m, its barometric-pressure range as 260 to 1,100 hPa, and its compass as 0–359° in 1° increments with 16-point direction display. Casio PRG-270-1 specifications
As an Amazon Associate I earn from qualifying purchases.
Check the module and buttons
Look for module number 3414 on the watch or its case back before following these steps. Casio’s Operation Guide 3414, dated 2013, gives the procedures below. From Timekeeping or another sensor mode:
- A: start altitude measurement.
- B: enter barometer/thermometer measurement.
- C: take a compass reading.
Barometer/temperature and compass readings appear in about one second. Altitude measurement begins after you press A and continues automatically. These button sequences are specific to module 3414.
#1 Best Overall

- Tough Solar Power, 100M Water Resistant, Low Temperature Resistant (-10 C / 14 F), Altimeter, Digital Compass, Barometer, Thermometer. Thermometer Display range: -10 to 60 C (14 to 140 F) Display unit: 0.1 C (0.2 F)
- Full Auto LED (Super Illuminator) Backlight with Afterglow, World Time, 31 time zones (48 cities + UTC), city name display, daylight saving on/off, Sunrise/Sunset Data, 5 Daily Alarms (4 one-time and 1 snooze alarm)
- Hourly Time Signal, 1/10 Second Stopwatch, Countdown Timer, 12/24 Hour Formats, Button operation tone on/off
- Storage Battery: Solar Rechargeable Battery, Battery Level Indicator
- Power Saving Function, Approx. Battery Life: 9 months on full charge (without further exposure to light), Module 3415
How to use the altimeter
Set a known altitude reference
The watch estimates altitude from changes in atmospheric pressure; it does not directly measure height above sea level. Before a hike, find the elevation of a known location on a reliable map or marker and enter it to improve the estimate.
- Enter Altimeter Mode.
- Hold E for at least two seconds, until
ALTIappears. - Use A (+) or C (−) to set the reference altitude. Each press adjusts it in 1 m (5 ft) steps.
- Press E to exit.
Take readings and track relative change
From Timekeeping or any sensor mode, press A. The watch displays altitude and continues taking readings. The manual describes selectable 5-second or 2-minute measurement intervals; Casio’s product specifications describe readings every five seconds initially, followed by two-minute intervals. Check the interval and unit displayed on your watch rather than assuming the display refreshes at one fixed rate.
To measure altitude change from a point, enter Altimeter Mode and press E to set that point as zero. The displayed altitude differential then shows relative gain or loss from that reference; it is not a replacement for map elevations or route planning. During a trek, compare readings with known trail markers or map elevations and reset the reference when appropriate. Weather-related pressure changes can shift the estimated altitude.
Free tools Windows power users keep installed
One-click scans. No signup required.
Rank #2
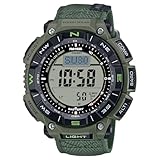
- Eco-Friendly Design for True Explorers Constructed with bio-based resin and a flame-retardant faux leather band, this watch combines sustainability with rugged durability for serious outdoor enthusiasts.
- Triple Sensor Technology Stay informed with on-demand compass bearings, barometric pressure changes, altitude tracking, and accurate temperature readings—wherever the trail leads.
- Tough Solar Power No batteries to replace. The solar-powered battery keeps your adventures going, with up to 27 months of runtime in power-saving mode.
- 100M Water & -10°C Temperature Resistance Designed to withstand both freezing mountain mornings and wet river crossings—this watch is ready for any environment.
- Dual-Layer LCD with Direction Bezel Navigate your journey effortlessly with a large, easy-to-read display and rotating bezel for directional orientation.
How to use the barometer and thermometer
Take a pressure reading
Press B from Timekeeping or another sensor mode. BARO appears while the watch measures, followed by pressure and temperature. Casio’s Operation Guide 3414 says readings are taken every five seconds for the first three minutes, then every two minutes. The pressure graph records automatic readings at two-hour intervals. It shows up to 42 hours of history, or up to 22 hours when the pressure-change indicator is enabled.
Read trends from a stable elevation
Rising pressure generally points toward fairer weather ahead, while falling pressure generally points toward worse weather, according to Casio. Treat that as a clue, not a standalone forecast. Climbing or descending also changes pressure, so readings taken while changing elevation do not provide a clean weather trend. For a more useful comparison, observe pressure while remaining at a stable elevation.
To enable the barometric-pressure-change alert, enter Barometer/Thermometer Mode and hold B for at least two seconds. When active, the watch takes readings every two minutes regardless of mode.
Rank #3

- case diameter: 52 millimeters
Interpret temperature cautiously
The watch also displays temperature, but a reading taken while it is on your wrist can be affected by body heat and the surrounding conditions. The cited Casio specifications and guide do not establish a calibrated method for measuring ambient temperature. Do not rely on the watch as a medical or safety instrument.
Recommended Free Tools
How to use and calibrate the compass
Calibrate in two opposing directions
Before relying on a direction reading, perform bidirectional calibration:
- Enter Digital Compass Mode and hold E for at least two seconds.
- Follow the on-screen prompts to calibrate two opposing directions.
- Keep the watch still during each step, and make sure the directions are exactly opposite. Choose a calibration location similar to the environment where you will use the compass.
Nearby metal, electrical equipment, vehicles, or strong magnetic sources can interfere with compass readings. If readings are inconsistent, move away from possible sources of interference and repeat calibration.
Rank #4

- Casio's Tough Solar Technology charges your watch by converting light to energy
- Part of Casio's green initiative - Featuring Eco-Friendly Biomass Construction and environmentally friendly / recyclable packaging, paperwork & user's manual
- 100M Water Resistance | Rotating Bezel | Super Illuminator w/ Full Auto LED/LCD Screen
- Bluetooth Ready | Pair with your smartphone, and easily record the date, time, or your position on a map within the Casio App
Take a direction reading
Press C and hold the watch face horizontal. The compass indicates north and the direction at the 12 o’clock position. If using a map, align its north reference with the watch’s indication. Make sure the watch’s setting—magnetic north or corrected for magnetic declination to true north—matches the reference on your map.
Use Bearing Memory as a heading aid
Casio also documents Bearing Memory, which stores a target direction. It can help you keep a chosen heading when you cannot continuously see the target. It does not provide GPS position or obstacle avoidance, so it cannot tell you where you are or guide you around terrain.
The Tool Desk
Outbyte PC Repair FREEClear out junk files and repair common Windows errorsFree Scan →Outbyte Driver Updater FREEScan for outdated or missing drivers - takes under a minuteDriver Scan →Understand the limits before relying on readings
Casio Computer Co., Ltd., in Operation Guide 3414 (2013), warns: “The measurement functions built into this watch are not intended for taking measurements that require professional or industrial precision.” The guide also says: “When engaging in mountain climbing or other activities in which losing your way can create a dangerous or life-threatening situation, always use a second compass for direction readings.” These are the manufacturer’s cautions, not an independent accuracy test.
Quick Recap
- Use a known altitude reference and compare altitude estimates with known elevations; atmospheric-pressure changes can affect them.
- Read pressure trends at a stable elevation so that ascent or descent does not confound the weather signal.
- Calibrate the compass, hold it horizontal for readings, and match its north reference to the map.
- For navigation where getting lost could be dangerous, carry and use an independent compass.
Product prices and availability are accurate as of the date/time indicated and are subject to change. Any price and availability information displayed on Amazon at the time of purchase will apply.